Create project schedule
This section describes how to create a project schedule.
To create a project schedule, proceed as follows:
- Open the search box (ALT+Q) and find the Project Schedules page.
- Click on the search result for Project Schedules.
- The Project Schedules page is displayed. All existing project schedules are displayed on this page.

Figure: Create Project Schedule - To create a new project schedule, click the New option in the menu bar.
- The Project Schedule page is displayed.
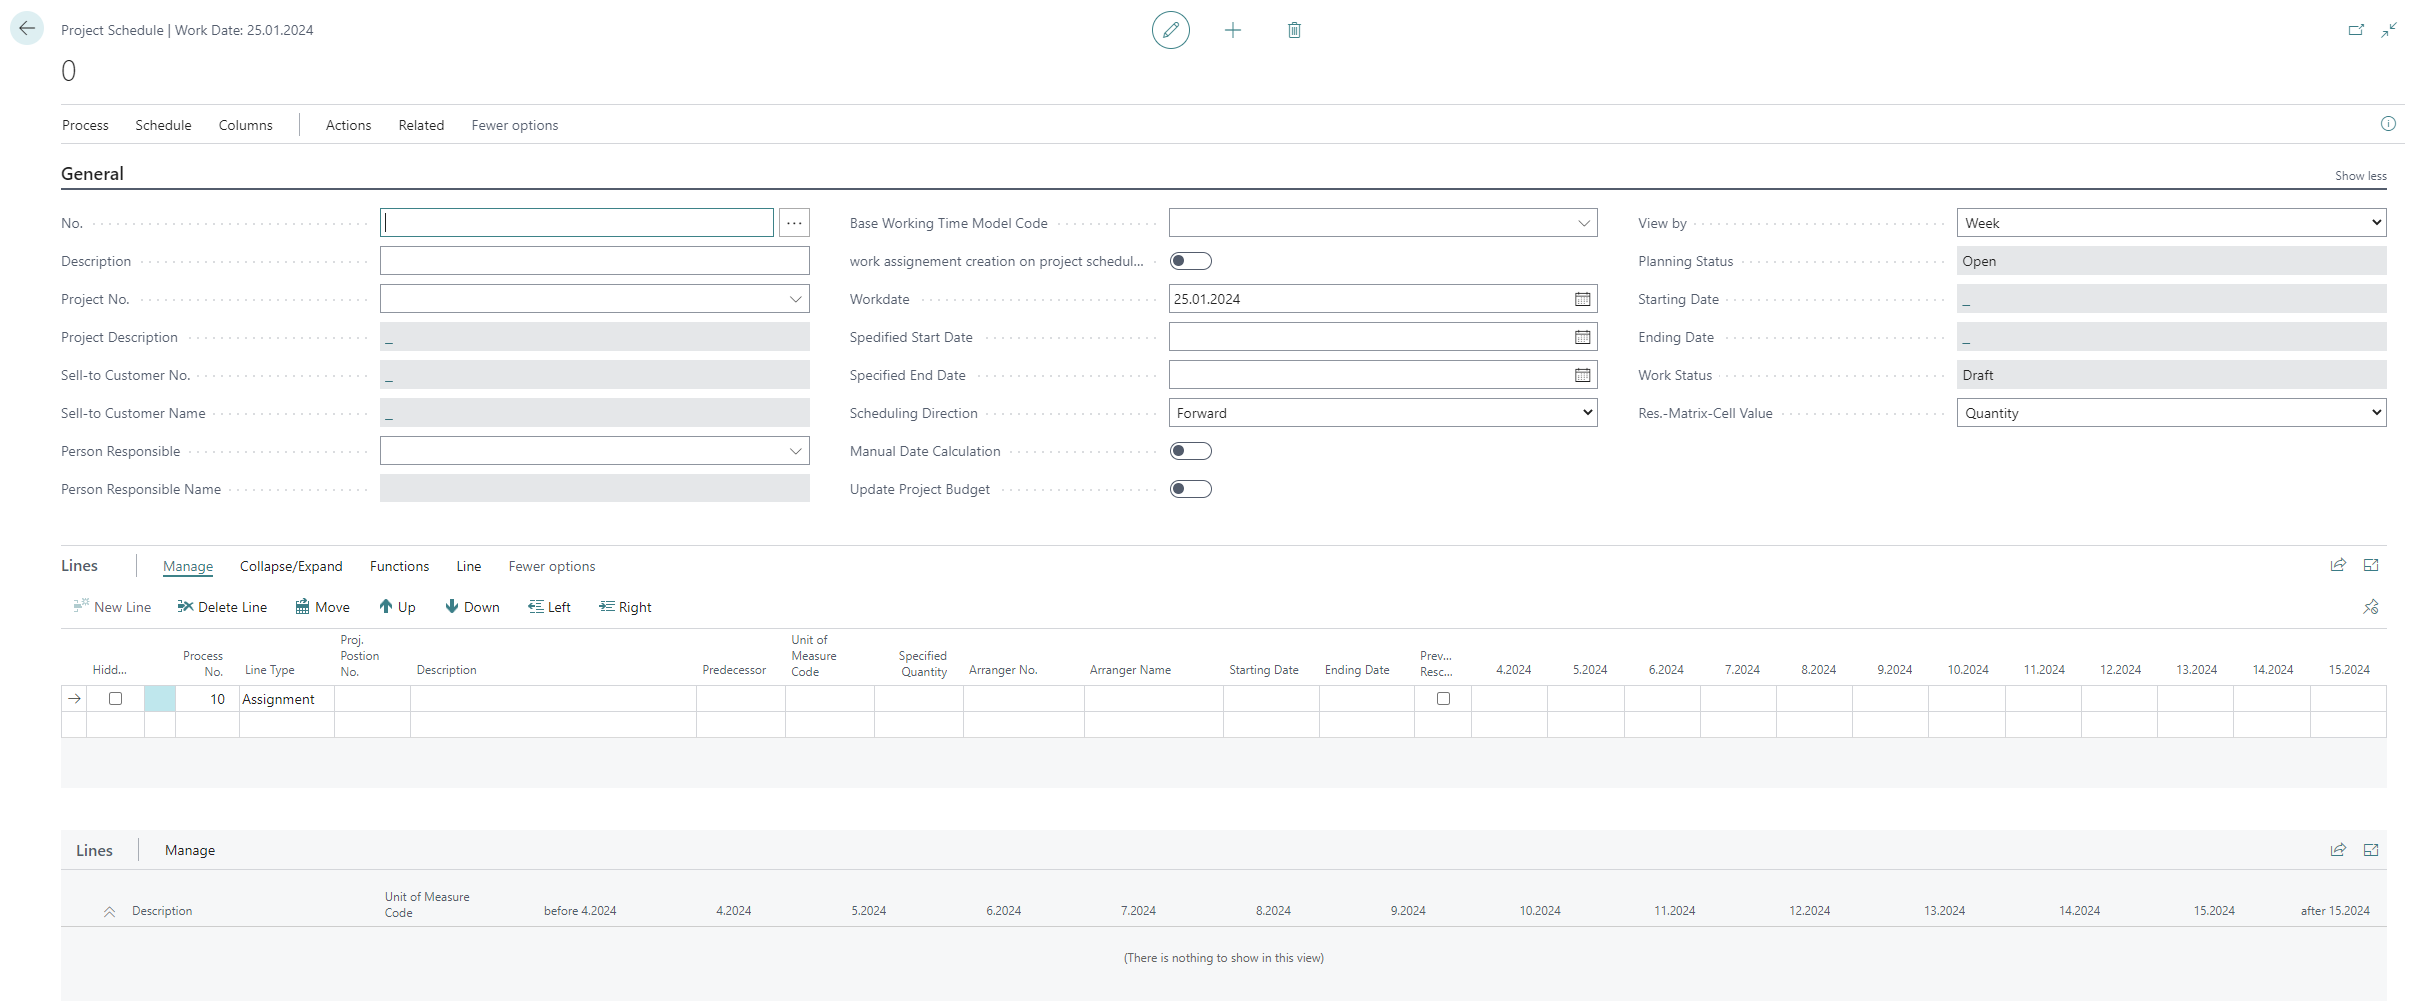
Figure: Project Schedule Page - Complete the information under the General tab:
| Field | Description |
|---|---|
| No. | The number of the project schedule is automatically assigned by the system when you set up the number series. For more information on setting up the number series for project schedules, see the section Set up number series for project schedules. |
| Description | In this field you can specify a description, if you first assign the project for this project schedule in the Project No. field, the system will insert the project name in this field. |
| Project No. | Enter the project under the Project No. field to assign the project schedule to this project. The assignment is necessary to transfer budget lines from the project to the lines of the schedule later in this tutorial. For more information, see section Transfer project budget lines to project schedule. |
| Project Description | This field is automatically filled by the system and cannot be edited. The displayed value corresponds to the description of the project in the Project Description field on the project map. Clicking on the displayed value navigates to the Project List page. |
| Sell-to Customer No. | This field displays the number of the customer for which this project was created. |
| Sell-to Customer Name | This field displays the name of the customer for which this project was created. |
| Person Responsible | In this field you can specify the code of the project owner. If you have already specified a project in the Project No. field, this field will be filled in automatically by the system if a responsible person is defined on the project card. |
| Person Responsible Name | This field displays the name of the responsible person if you have specified the code of the responsible person in the Person Responsible field. If you have already specified a project in the Project No. field, this field will be filled in automatically by the system. |
| Base Working Time Model Code | In this field you can store the working time model. This field affects how the rows are scheduled in the project schedule. For more information, see the section Create working time model. |
| Work Assignment Creation on Project Schedule Activation | Activate this slider if you also want to create tasks when activating the schedule (value In progress in the Planning status field). |
| Specified Start Date | In this field you can specify the start date for the project schedule. This date determines the start date of the schedule lines. |
| Specified End Date | In this field you can specify the end date for the project schedule. This date determines the end date of the schedule lines. |
| Manual Date Calculation | Activate this option to calculate dates manually. |
| Update Project Budget | Activate the slider for the Update Project Budget option. This option allows you to transfer planned work hours (for example, the number of hours required for an item in the schedule) to the project budget when the schedule is activated. For more information, see the Add missing quantity to project schedule lines section. |
| View By | The values that can be selected in this field (Day, Week, Month, Quarter, Year or Accounting Period) allow you to specify the timing in the schedule lines. |
| Planning Status | This field shows the status of the project schedule. |
| Starting Date | This field shows the starting date of the project schedule. |
| Ending Date | This field shows the ending date of the project schedule. |
| Work Status | This field displays the status of the project schedule. |
| Res.-Matrix-Cell Value | In this field you can choose between the values Quantity and %. The selection of the value affects the lines displayed under the Lines tab. |
You have created a project schedule, but you still need to add lines to this project schedule.
In the following sections you will learn how to:
- Transfer project budget lines to project schedule
- Structure project schedules
- Add missing quantity to project schedule lines
- Recalculate dates
- Assign arranger
- Activate project schedule
Transfer project budget lines to project schedule
This section describes how to transfer lines from the project budget to the project schedule. This function requires a project budget, for more information on how to create a project budget see the section Define project budget.
To transfer the lines to the project schedule, proceed as follows:
- Open the search box (ALT+Q) and search for the Project Schedules page.
- The Project Schedules page is displayed. All existing project schedules are displayed on this page.
- Open the corresponding project schedule for the project you want to plan.
- Click Process > Get Lines in the menu bar.
- The Get Project Budget Lines window is displayed. Use the filter options to define the lines you want to transfer. If you do not apply a filter, all positions (with the project budget lines) will be transferred from the project budget to the project schedule.
- To transfer the lines from the project budget to the project schedule, click OK.
- The lines are transferred to the project schedule.
You have transferred lines from the project budget to the project schedule.
Figure: Project Schedule with Transferred Project Budget Lines - When transferring the project budget lines to the project schedule, the values contained in the Line Type column are changed. In our example, the HeadLine and Position values in the project budget are changed to Phase and Assignment when transferred to the project schedule.
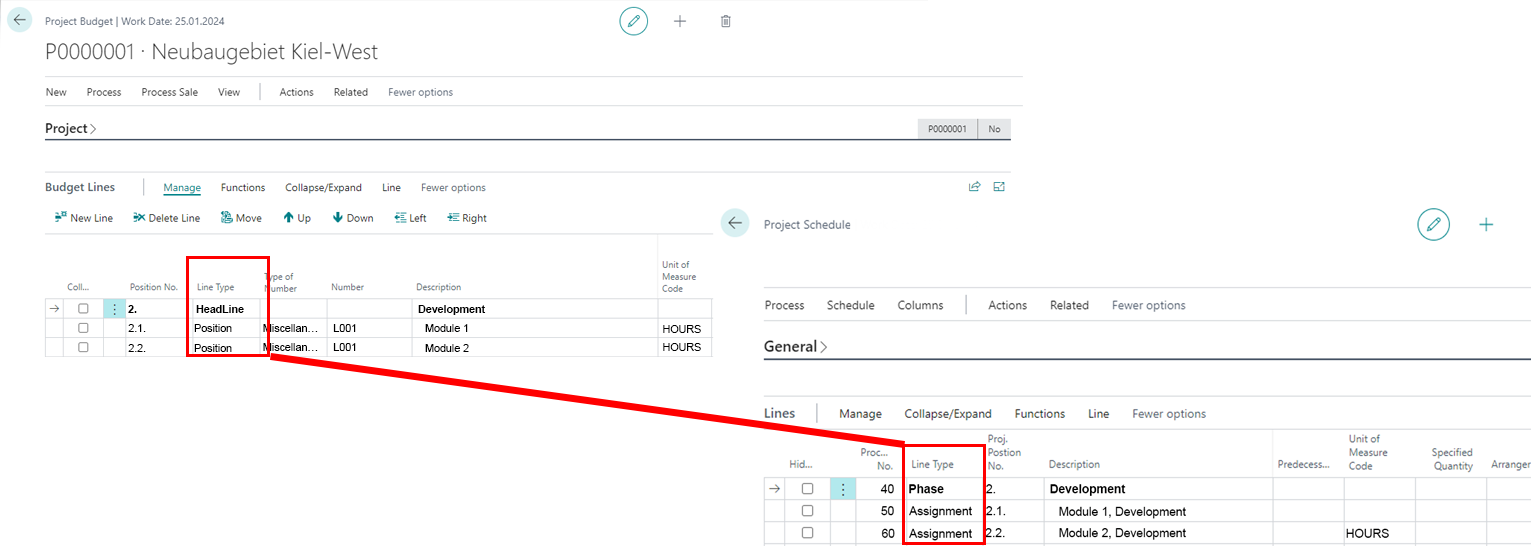
Figure: Transfer of the Project Budget Lines
You have transferred the project budget lines to the project schedule. If (as shown in our screenshot) no quantities have been transferred for planning, this is because they are not stored in the project budget. However, you can add these quantities in the project schedule and transfer them back to the project budget. For more information, see the section Add missing quantity to project schedule lines.
Structure project schedules
In this section you will learn how to structure the project schedule. In the Transfer project budget lines to project schedule section, it is described how you can transfer lines from the project budget into the project schedule. As shown in the screenshot (see Figure: Transfer of the Project Budget Lines), this involved creating a Phase from each line from the project budget with the value HeadLine in the project schedule. For each line with the value Position from the project budget, a line with the value Assignment was created in the project schedule.
The following options are available for structuring the project schedule under the Lines tab under the Manage menu item:

| Option | Description |
|---|---|
| New Line | Creates a new line between the selected line and the line above it. |
| Delete Line | Deletes the selected line. |
| Move | Moves the selected line. |
| Up | Moves the selected line up in the structure. |
| Down | Moves the selected line down in the structure. |
| Left | Indents the selected line to the left. |
| Right | Indents the selected line to the right. |
Note
Same level for assignments under one phase
For example, if you add an assignment at a later point in time using the New Line option, you must assign the line with the Assignment value to the appropriate phase so that it can be automatically scheduled in the project schedule.
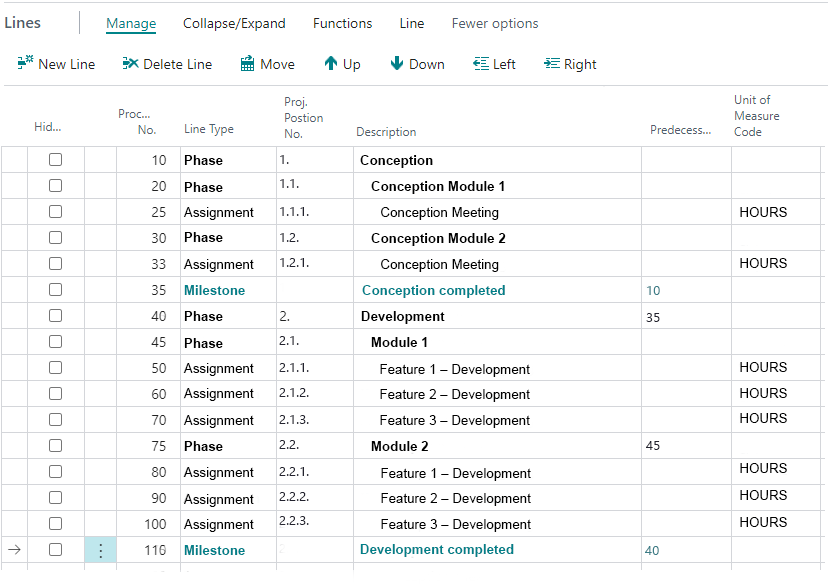
The indentations of the assignments Feature 1 - Development, Feature 2 - Development, and Feature 3 - Development indicate that these tasks are organized into the Module 1 phase. The lines with the phases Module 1 and Module 2 are assigned to the parent phase Development (see figure Structured Project Schedule).
Note
Milestones
You also have the option to create so-called milestones. If you use the value Milestone in the Line Type column, you have to enter the process number of the assignment in the Predecessor column. For example, in the figure Structured Project Schedule, the phase Conception is defined as the predecessor for Concept completed milestone.
Note
Time Planning and Structure
You can define the chronological sequence of assignments, phases and the achievement of milestones via the Predecessor column. For scheduling purposes, it is taken into account that all assignments assigned with indentations to a phase must be completed first before subsequent phases or milestones are completed.
Add missing quantity to project schedule lines
If you have transferred the lines for the project schedule from the project budget (see Transfer project budget lines to project schedule) and in the project schedule the value in the Specified Quantity field is not specified, this is because in the project budget no value is stored for the Quantity field in this budget line.
This section describes how to add quantities to the project schedule and transfer them back to the project budget at the same time. To do this, proceed as follows:
- Open the search box (ALT+Q) and search for the Project Schedules page.
- The Project Schedule page is displayed. All existing project schedules are displayed on this page.
- Open the project schedule for the corresponding project.
- In the General tab, check if the Update Project Budget option is enabled. This option must be enabled for the following description.
- Enter the estimated quantity in the schedule line under the Specified Quantity field. This quantity will then be transferred to the project budget.
You have entered the missing quantities in the project schedule. When you enter the quantities, the system automatically calculates an ending date. When you activate the schedule, the values you entered in the schedule lines are transferred from the Predefined Quantity field to the project budget (if the Update Project Budget slider is activated).
Recalculate dates
After entering values in the fields under the Specified Quantity column, we recommend that you recalculate the dates before proceeding to assign the assignments. To recalculate the dates, proceed as follows:
- Open the search (ALT+Q) and search for the Project Schedules page.
- The Project Schedule page is displayed. All existing project schedules are displayed on this page.
- Open the project schedule for the corresponding project.
- Click Process > Recalculate Dates in the menu bar.
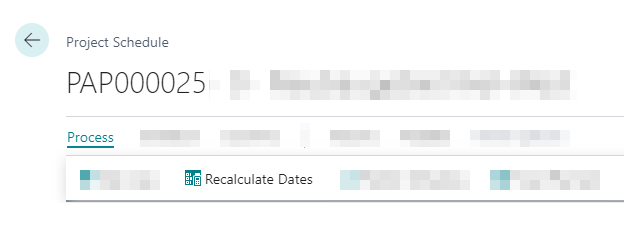
Figure: Recalculate Dates
The information in the Starting Date and Ending Date columns will be recalculated.
Assign arranger
This section describes how to assign the assignments in the schedule to a resource, customer, vendor or a resource group.
To assign the assignment, proceed as follows:
- Open the search (ALT+Q) and search for the Project Schedules page.
- The Project Schedule page is displayed. All existing project schedules are displayed on this page.
- Open the project schedule in which you want to assign tasks.
- Click in the input field under the Arranger Name column for the corresponding task you want to assign.
- The Edit – Assigned Arrangers window is displayed.

Figure: Assigned Arrangers - In the input field for the Arranger Type column, select between the following values:
- Resource: You assign the assignment to a resource.
- Customer: You assign the assignment to a customer.
- Vendor: You assign the assignment to a vendor.
- Group (Res.): You assign the assignment to a resource group.
- The associated number/code is added to the input field for the Arranger No. column. The Arranger Name and Unit of Measure Code fields are filled by the system with the associated values.
- Enter the quantity for the line in the input field of the Specified Quantity column. Alternatively, you can also define a percentage share. To do this, enter the value in the Share % input field.
You have assigned the assignment to a resource, customer or vendor or to a resource group.
Activate project schedule
This section describes how to activate the schedule for a project.
Note
Vorgegebene Mengen aktualisieren
When activating the project schedule, you have the possibility to update and transfer changed line values in the Specified Quantity column to the project budget (the origin of phases and assignments). To transfer the line values from the Specified Quantity column for the assignments to the project budget, the slider of the Update Project Budget option must be activated in the schedule under the General tab.
To activate the schedule, proceed as follows:
- Click the Process > Publish Schedule option in the schedule menu bar.
- A dialog box is displayed confirming that the schedule has been activated.
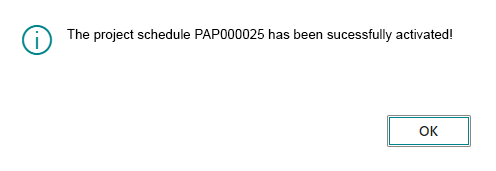
Figure: Activate Project Schedule - The value in the Planning Status field is changed from In Progress to Activated. At the same time, on the Project Schedules page, the schedule is highlighted in green to indicate this status. Schedules that are not activated are highlighted in red.

Figure: Project Schedule Overview
You have activated the schedule.